We may love our cars, but it's doubtful
many
of us are in love with our driveways.
For some reason, these expensive, bleached slabs
of
concrete manage to
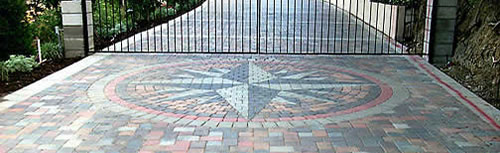
take over the front of our houses. But a new crop of concrete stains
that you can apply yourself can help turn that bland and ugly driveway
into a beautiful and bold front-yard statement.
Jane tip: Pay close attention
when
choosing the type
of stain. (For this project, we used a water-based stain from a company
called Americrete.)
Acid-based stains are more complicated to apply
but generally
produce richer and deeper color variations. Water-based or acrylic
stains are easier and safer to work with but can look opaque and
one-dimensional due to the lack of chemical reaction.
Beware of film-forming stains, paints or sealants
that do not react
with the chemicals in the concrete nor permeate the pores; they simply
cover over it and will not wear as well.
Step 1: Measure the square
footage
of concrete so
you can buy the right amount of stain. To do this, measure the length by
the width (don't forget any small areas to the side). Buy enough stain
to cover, keeping in mind that if you're using a multilayer, accented
approach as we did, you won't need full coverage for accent coats.
Step 2: Clean the concrete
surface
with a degreasing
cleaning product (you can buy a specific degreasing concrete solution
from a hardware store) and ensure it is clear of any debris.
Staining supplies


This challenging project takes two to three days after power washing
the drive.
Tools:
• Measuring tape
• Plastic garden sprayer (all parts must be
nonmetallic)
• Push broom
• Power washer (rented)
• High-pressure, low-volume sprayer and compressor
(rented)
• Brushes or sponges for smaller areas
• Paint roller and pan
Supplies:
• Degreasing cleaning product
• Masking tape and masking paper or plastic
sheeting
• Efflorescence blocker
• Roller covers
• Concrete stain in multiple colors
• Concrete sealer
• Vinyl or nitrile gloves
• Protective eyewear
• Protective masks, as recommended by manufacturer
Source: Be Jane
Do your best to remove oil stains with the
degreaser, then use the
power washer to thoroughly clean the entire surface. Let it completely
dry, then sweep off remaining debris or dirt.
Jane tip: If you've just poured
the
concrete, make sure it has been cured for at least 28 days before
beginning any treatment .
Step 3: Cover everything
surrounding
the driveway with
masking paper or plastic sheeting. One of the things we liked about
Americrete products was that they are nontoxic and biodegradable,
meaning we weren't likely to damage the lawn or nearby plants, which
cut down on masking.
Don your protective gear — this is always
important, but especially so
if you use acid-based stains.
Safety tip: If you choose an
acid-based stain, make
sure you ventilate, ventilate, ventilate. Wear protective clothing at
all times. Use rubber gloves, goggles, thick socks and anything else to
keep the stain away from your skin.
Step 4: If your driveway is
fairly
new and has
evidence of efflorescence (a leaching of salts from soils under the
driveway up through the concrete, leaving a white, powdery stain),
start by applying an efflorescence blocker with a plastic garden
sprayer. Work in a simple back-and-forth motion, applying the blocker
evenly, then brush it out further with a push broom. Avoid walking on
the wet surface until the blocker dries — about an hour.
Step 5: Starting in a corner,
begin
spraying a smooth
coat of stain, using the high-pressure, low-volume sprayer at a
distance of about 2 feet. If you want a textured, stone-like look, it
will require a multiple-coat approach. Spray on an even base coat layer
and let it dry for about an hour, per the manufacturer's instructions.
Jane tip: With different types
of
stains, you may need
to allow up to 24 hours' drying time — and you'll want to keep
critters, kids and adults off the surface while it dries. Footprints in
wet stain can stay forever.
We continued to spray on successive coats in
basically the same way,
though each coat was more selectively applied — we spayed some areas
more than others. This mottled, "air-brushed" technique is what gave us
the rich, textured look of stone.
It's important to let the stain dry, then consider
whether the
texture and color are coming out right. You can continue adding accents
and layers until you get it just right. The technique is similar to
faux-painting, in that you are trying to create an un-patterned, natural
look.
Step 6: After you're happy with
the
look of your
staining, let it dry for a full 24 hours (again, keep feet off the
surface). When it's completely dry, roll on the sealant using a low-nap
roller. We recommend a satin finish, which will further darken the
stain and help give it a slight sheen. Let it dry.
Jane tip: As with the stains,
there
are different
forms of sealants. Many sealants will result in a slick concrete
surface when wet. Look into nonskid or slip-resistant sealers or
additives if you have a steep driveway or are concerned about the slick
surface.
Congratulations! You've just taken your driveway
from gray to
gorgeous. Concrete staining is a bit complicated and requires a few
tools you may need to rent, but the end effect will give your driveway
a whole new attitude.
Be Jane is an occasional home-improvement
feature
in digs. It's adapted from
www.BeJane.com,
the online community created by Heidi Baker and Eden Jarrin.
As tools, conditions in the home, materials,
products used or the
way they are handled can vary widely, in no case will Be Jane or The
Seattle Times be liable for personal injury, any property damage or any
other loss occurring from the use of this information. The reader is
solely responsible to consult with a professional if in doubt.